Oh, kids... and their neat freak moms. ;) I would have LOVED to have thought of this little "neat freak cheat sheet" tip a few years ago! Instead of running to the laundry room for a bib (or for ANOTHER bib or 3 for those spaghetti nights), a stick-on hook on the back of the highchair does the trick perfectly. Anyone else having one of those why-didn't-I-think-of-that moments? Well, it's a-ok. Just stick and hang away, and make meal time a little less chaotic!
Now, THAT's neat!
Showing posts with label children. Show all posts
Saturday, July 13, 2013
Saturday, November 13, 2010
Day 68: A Fear of Nails... and the Holes They Leave Behind!
I hate nails. No, not the kinds on the end of your fingers and toes (although, it IS pretty creepy when people grow them to obscene lengths!). I'm talking about the kind of nails you hang pictures on, the kind that leave lovely, flaky holes in the drywall... holes you have to repair if you ever have second thoughts about your decor... or if you decide to move.

At any rate, I wanted to share one easy thing you can do in a child's bedroom if you, too , have a fear of nails... or if you just want a fun way to display artwork and pictures!
I used this simple technique in my daughter's room, and it has been a big hit -- for years! It's cute. It's fun. And it can be changed year-to-year (or week-to-week if you are so inclined). AND... it only used TWO nails! ;)
Just select a wall space where you would like to show off some of your offspring's handiwork. Hammer in two nails (preferably nails with big heads!) on either side of the chosen space. Then tie on some string or twine, leaving a little bit of slack. (This string will serve as a "clothesline" for pictures, and it will hang down a bit in the middle, so be sure to calculate that in as you place those darn nails!)
Next, gather those works of art, and hang them up! I used some cute little decorative clothespins that I picked up at Ikea. Just about any little clip will do!

Arrange them however you'd like, and, voila! A neat -- but very cute and fun -- display!

Now, THAT's neat!

At any rate, I wanted to share one easy thing you can do in a child's bedroom if you, too , have a fear of nails... or if you just want a fun way to display artwork and pictures!
I used this simple technique in my daughter's room, and it has been a big hit -- for years! It's cute. It's fun. And it can be changed year-to-year (or week-to-week if you are so inclined). AND... it only used TWO nails! ;)
Just select a wall space where you would like to show off some of your offspring's handiwork. Hammer in two nails (preferably nails with big heads!) on either side of the chosen space. Then tie on some string or twine, leaving a little bit of slack. (This string will serve as a "clothesline" for pictures, and it will hang down a bit in the middle, so be sure to calculate that in as you place those darn nails!)
Next, gather those works of art, and hang them up! I used some cute little decorative clothespins that I picked up at Ikea. Just about any little clip will do!
Arrange them however you'd like, and, voila! A neat -- but very cute and fun -- display!
Now, THAT's neat!
Tuesday, August 17, 2010
Day 50: More Toy Management
My little boy is now about 8-months old, but he is already well-adept at making a mess! He also gets bored very easily. So, these two factors together translate into a bunch of baby toys strewn all about the house.
As I mentioned in a previous post, I used some canvas boxes to tackle the toy problem in his room.... but this did not quite take care of the toy problem all over the house, mostly because he's too young to go upstairs to his room by himself and play (and somewhat because I am often just too busy with other things to go up there myself).
Solution!?!? A flexible, plastic toy bucket. And it's LABELED... I mean, personalized, too!
I make these myself (you can check out my etsy store HERE), and there's not too much to it. Just find a good size and color for your container, and you can apply vinyl lettering (from Uppercase Living, one of my "little side businesses") to customize your creation!
Here is Iain IN his toy tub.

As you can see, it's quite handy, cute and WAY neater than a bunch of toys on the couch, in the Pack n' Play or all over the floor... where the dog toys end up! (And as soon as I get a "free moment," I'll post a photo of the tub with some actual toys in it!)
Now, THAT's neat!
As I mentioned in a previous post, I used some canvas boxes to tackle the toy problem in his room.... but this did not quite take care of the toy problem all over the house, mostly because he's too young to go upstairs to his room by himself and play (and somewhat because I am often just too busy with other things to go up there myself).
Solution!?!? A flexible, plastic toy bucket. And it's LABELED... I mean, personalized, too!

I make these myself (you can check out my etsy store HERE), and there's not too much to it. Just find a good size and color for your container, and you can apply vinyl lettering (from Uppercase Living, one of my "little side businesses") to customize your creation!
Here is Iain IN his toy tub.

As you can see, it's quite handy, cute and WAY neater than a bunch of toys on the couch, in the Pack n' Play or all over the floor... where the dog toys end up! (And as soon as I get a "free moment," I'll post a photo of the tub with some actual toys in it!)
Now, THAT's neat!
Friday, March 5, 2010
Day 22: Think INSIDE the box
My newborn son got some really neat baby gifts and several fun toys for Christmas. Of course, he was only 3-days old at the time, so I just stuck them all in his room.
On the floor.
I figured I would deal with them later. (I was a bit too tired to worry about that, for some reason!)


Being obsessed with organization, though, I had to tackle this problem. Simple solution: I bought a few chocolate-brown canvas boxes to match the colors in his room.

Then I simply unwrapped all the toys, put them in one box and placed it on the floor, and I put the other miscellaneous items in the other box and placed it on the night table.
Instant organization!


(That's why I love baskets and boxes and use them in just about every room in my house!)
Now, THAT's neat!
On the floor.
I figured I would deal with them later. (I was a bit too tired to worry about that, for some reason!)
Being obsessed with organization, though, I had to tackle this problem. Simple solution: I bought a few chocolate-brown canvas boxes to match the colors in his room.
Then I simply unwrapped all the toys, put them in one box and placed it on the floor, and I put the other miscellaneous items in the other box and placed it on the night table.
Instant organization!
(That's why I love baskets and boxes and use them in just about every room in my house!)
Now, THAT's neat!
Monday, March 1, 2010
Day 17&18: A Simple Fix For Scrunchie Insanity
My daughter has about 18,000 hair scrunchies. You know, those stretchy, circular hair thingies made out of material and/or ribbons? Ok. It's not 18,000, exactly. But she has a LOT of them. And they take up an entire drawer and create quite a mess.
SO... I did a really simple fix for this. Have an empty paper towel roll? You do? Well, there you go. It's fixed! :)

Just put the scrunchies on the paper towel tube, and voila!

Tidy scrunchies!

You can just stick the entire contraption in the drawer, and it stays neat for whenever you use them. (Of course, I advise keeping the most "popular" scrunchies toward either end of the tube, that way it's easier to get to them! Otherwise, you may spend some time pulling them all off to get the one you want!)

Now, THAT's neat!
SO... I did a really simple fix for this. Have an empty paper towel roll? You do? Well, there you go. It's fixed! :)
Just put the scrunchies on the paper towel tube, and voila!
Tidy scrunchies!
You can just stick the entire contraption in the drawer, and it stays neat for whenever you use them. (Of course, I advise keeping the most "popular" scrunchies toward either end of the tube, that way it's easier to get to them! Otherwise, you may spend some time pulling them all off to get the one you want!)
Now, THAT's neat!
Tuesday, February 23, 2010
Day 13: My Daughter's Desk of Horror!
My 7-year-old daughter is a hoarder of things. LOTS of things: tiny scraps of paper, shiny gum wrappers, beads, balloons, ribbons, cheap plastic toys, candy, books, napkins, stuffed animals, cards, pencils, feathers and various unrecognizable doo-dads.
Well, these things end up in her room... all over her room. So, usually about once a month, I attack her space with a garbage bag -- and a vengeance -- valiantly resolved to rid her room of the ridiculous amount of clutter... without taking away all her fun, of course.
Tough job. Especially for a neat freak.
I would love to turn everything upside down and dump it into a big garbage can. But I won't do that. I've promised myself not to infect her too terribly with my tidying obsession. :)
But since her bedroom is still part of my house, I do have to help her "sort things out" now and again. And, yes, sometimes she helps me, and we go through all the things that we can throw away or donate. At other times, however, I simply tackle the task when she's at school. That way I get more done. (And she never remembers that tiny piece of pink, Mickey-shaped confetti she picked off the ground after a parade at Disney World!) ;)
At any rate, my goal the other day was to give my child some of her desk space back. After Christmas, the toys and gizmos completely took over her desk. It was, simply, an explosion of stuff, with no rhyme or reason. There were game cartridges on the floor, paper scattered all over (and under) the desk and her new magic kit piled up in the center. What a disaster.... and what a completely UNusable desk space!

So, I rearranged her toys in her closet (on the toy shelves... go figure!) and carefully placed all her paper and folders in one drawer; all her craft items in another drawer; and all her electronic gadgets in their own space -- for safe keeping (and so I wouldn't have to dig through random gift bags, tote bags, book bags, purses or otherwise to find them later on). I also placed a cute basket on her desk to "capture" random papers, little notebooks or folders she's using to write stories or draw pictures. I also left her most recent toy/craft out so she could pick up where she left off and finish it before we find a good spot for it to "live."
Here is the result. Still a little girl's desk, no doubt. But now a much more pleasant and usable space. AND, for the record, my daughter likes it, too!
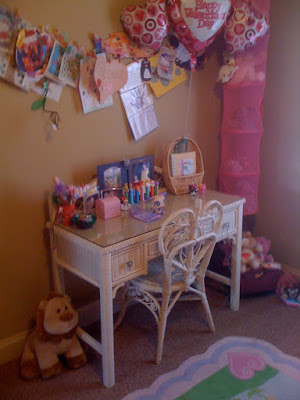
(BTW: to display her various arts and crafts from school, we hung up a "clothesline" over her desk, and we pin up her papers with cute clips and pins. This way she has her own artwork displayed, and it's tidy and also simple to change.)

Now, THAT's neat!
Well, these things end up in her room... all over her room. So, usually about once a month, I attack her space with a garbage bag -- and a vengeance -- valiantly resolved to rid her room of the ridiculous amount of clutter... without taking away all her fun, of course.
Tough job. Especially for a neat freak.
I would love to turn everything upside down and dump it into a big garbage can. But I won't do that. I've promised myself not to infect her too terribly with my tidying obsession. :)
But since her bedroom is still part of my house, I do have to help her "sort things out" now and again. And, yes, sometimes she helps me, and we go through all the things that we can throw away or donate. At other times, however, I simply tackle the task when she's at school. That way I get more done. (And she never remembers that tiny piece of pink, Mickey-shaped confetti she picked off the ground after a parade at Disney World!) ;)
At any rate, my goal the other day was to give my child some of her desk space back. After Christmas, the toys and gizmos completely took over her desk. It was, simply, an explosion of stuff, with no rhyme or reason. There were game cartridges on the floor, paper scattered all over (and under) the desk and her new magic kit piled up in the center. What a disaster.... and what a completely UNusable desk space!
So, I rearranged her toys in her closet (on the toy shelves... go figure!) and carefully placed all her paper and folders in one drawer; all her craft items in another drawer; and all her electronic gadgets in their own space -- for safe keeping (and so I wouldn't have to dig through random gift bags, tote bags, book bags, purses or otherwise to find them later on). I also placed a cute basket on her desk to "capture" random papers, little notebooks or folders she's using to write stories or draw pictures. I also left her most recent toy/craft out so she could pick up where she left off and finish it before we find a good spot for it to "live."
Here is the result. Still a little girl's desk, no doubt. But now a much more pleasant and usable space. AND, for the record, my daughter likes it, too!
(BTW: to display her various arts and crafts from school, we hung up a "clothesline" over her desk, and we pin up her papers with cute clips and pins. This way she has her own artwork displayed, and it's tidy and also simple to change.)
Now, THAT's neat!

Subscribe to:
Posts (Atom)