YEP -- I'M A NEAT FREAK!

I am a self-diagnosed neat freak. I love to clean and I love to organize. (If I could have a container, holder and/or label for EVERYTHING, my life would be complete!) And this is my brand new blog for everything NEAT!
I have a toddler in perpetual motion, a packrat daughter, a dog and a disorganized husband... and I hope to share the challenges, trials, errors, rewards and insights of being a bit "too clean obsessive" in a family that's not so in love with neatness. And I am making a promise to clean, rearrange, organize and simplify my life... and help you along the way! SO stay tuned for my journey toward everything orderly and efficient!


Showing posts with label kitchen. Show all posts

Friday, June 14, 2013

Day 137: MORE vinyl in the kitchen!

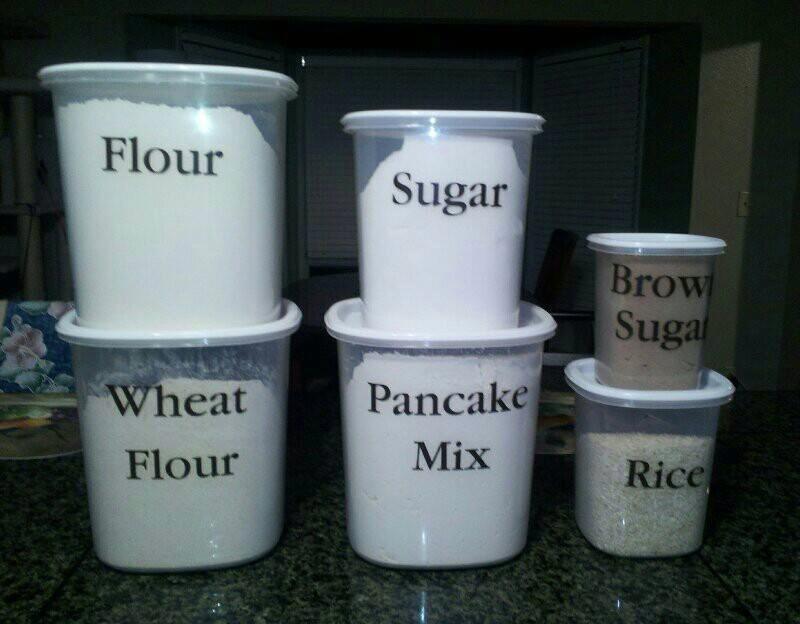
I can't sing the praises of vinyl lettering enough for fun, decor AND organization!  I LOVE it! For a neat person who would have a special container and a label for EVERYTHING, you just can't beat this! :)  I had to show this lovely photo of a woman after my own heart, who is getting her pantry super neat.  And YOU can do it, too!  Find some containers of your choosing - whether you go to the Container Store or buy Tupperware or you head to the nearest Dollar Tree and get everything for a buck, it's up to you, your style and your needs.  Go with glass, or select plastic... pick one color, or color coordinate!  THEN, get rid of those annoying cardboard boxes and put common, useful things like sugar, brown sugar, powdered sugar, rice, pasta, cake flour, all-purpose flour and whatever else you'd like (think cookies and crackers, too) into your containers.... and LABEL THEM!  I prefer to use Uppercase Living chalk labels (or dry erase labels).  You can even purchase a whole chalk (or dry erase) panel and cut them down to size!  OR, chose a font and color and custom your own lettering for each container. Just be sure to measure twice; order once! :) 


Now, THAT's neat!

Monday, March 4, 2013

Day 136: Mail Bucket

I don't know about y'all, but the mail in my house has a tendency to spread out... and to migrate... and to take over many "usable" spots and work spaces in my kitchen.  Of course, I have a little system for wrangling bills... I open them immediately and then "file" them in a little holder on the counter... so I don't forget to pay them.  (Out of sight, out of mind... so they day!)  But what about all the OTHER stuff - you know, those letters, fliers, coupons, catalogs and other random odds and ends for my family?

Well, I finally got tired of this "OTHER stuff" being all over my kitchen counter, so I decided to reuse a little item I've had for a while now...  in a closet!  I just took this tin bucket and repurposed it.  Instead of adding flowers and nailing it up on a wall or hanging it outside, I put in a little burlap (which didn't make it to the photo - sorry, afterthought!) and then applied a meaningful, Uppercase Living expression, to give the old bucket some new life and interest!


Now, this fun little holder hangs from a burlap ribbon on the door to our garage, which is in our kitchen, near the counter where the mail used to collect.  I simply stuff the items inside, and we remove, use or toss those items as we get to them.  It's a really pretty - and organized - alternative to those random paper stacks!


Now, THAT's neat!

Friday, January 25, 2013

Day 133: Clever containers for the pantry

Like many households, we have lots of little, random things floating around in our pantry.  Actually, they don't float at all, but they do fall down between the wire shelves, get stuck behind (or under) other stored food items or get completely lost and forgotten somewhere in the spaces we can never see - or reach.  For those pesky little things, little things like seasoning mixes, soup packets, drink mixes and other pouches, snacks or small bags of things, I have found that Clever Container's containers are quite a clever solution!


I recently purchased 2 of these little cabinet organizers and put them to immediate use.  Now my pesky pouches and packets are well behaved... and easy to find.  AND... since they are all rounded up and in clear view, it makes it easier for me to see what I have... and what quick meal or snack I can whip up for kids or company!
  
Now, THAT's neat!


Friday, January 4, 2013

Day 132: The Dreaded Kitchen Drop-Off

You know that little space in your kitchen... the one that gets trashed by everything as soon as anyone comes home?!?!  Yes, THAT one.  No matter what you do to keep it clean, neat and orderly, somehow, candy wrappers, school papers, junk mail, bills, magazines, socks, jackets, toys and other odds and ends end up here.  Well... one solution is to just trash everything!  And believe me, I have been tempted to do this, MANY times! :)

The other option is to create a little "command center."  If you have time (and energy... and gumption), you can purchase a nice, organizational wall hanger or box... hey, even a file holder works to sort through papers, and they have some decorative ones or fun ones to fit your decor!

Another simple, quick method to get those papers to cooperate is to get some clothespins, write some helpful labels on them, and just pinch all that stuff together until you have a moment to look through and sort everything!

AND... of course, y'all know I love baskets and bins.  But a few, and throw things in there so they are out of site but still easily accessible!

Finally, purchase some fun, useful dry erase or chalk panels so you can keep track of menus, phone numbers, to-do lists, appointments and events and still have room to write down a motivational quote or an "I love you because..."  Uppercase Living offers so many wonderful options.  Click HERE to see them, and order anytime, online!

Now, THAT's neat!


Wednesday, July 11, 2012

Day 128: Beautiful, neat fridge

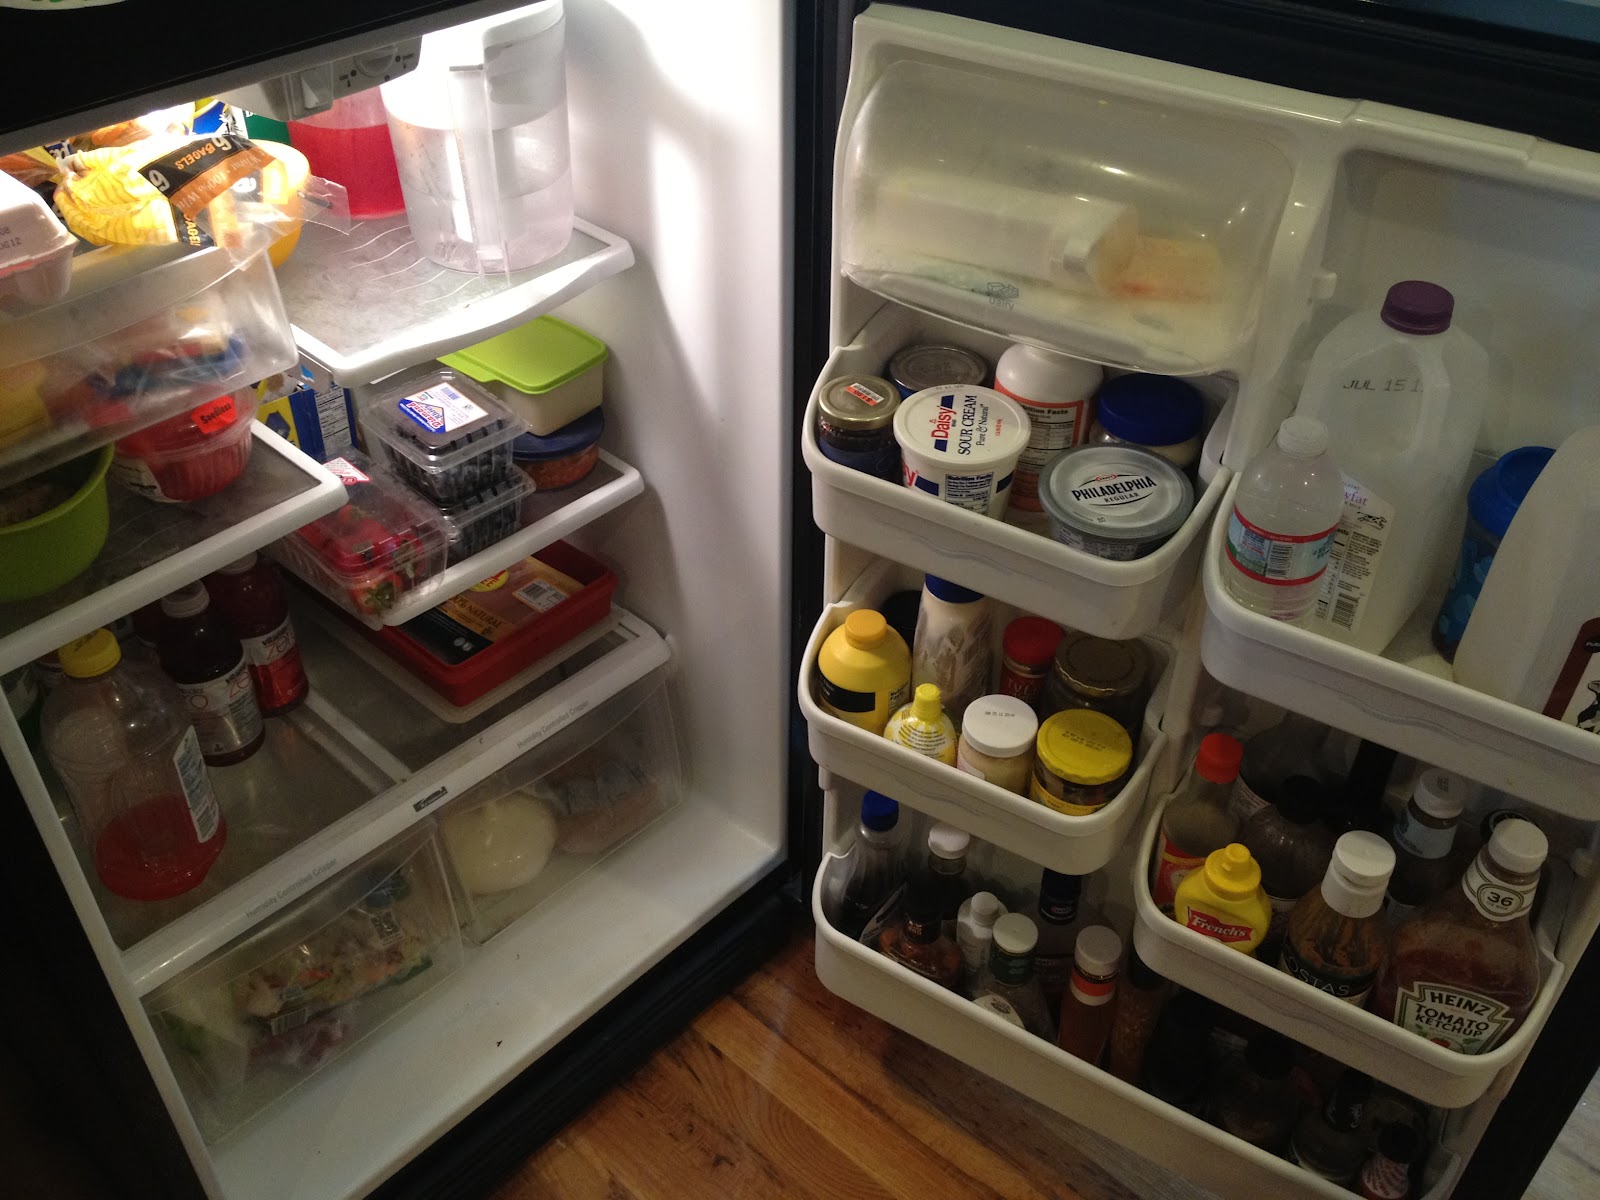
Ok... so I have talked about cleaning BEHIND and UNDER the refrigerator before, but beyond throwing away anything green or growing, I have not addressed cleaning INSIDE it.  Of course, as a neat freak, I am always cleaning up crumbs and spills with cleaning wipes.  But, this time around, I decided to remove EVERYTHING... and get this darn ice box in order!

You can see in this photo that the spills and stains weren't terrible... but they were still there!  Gross!  And these goops and blobs, of course, can cause your fridge to smell a little funky.  (I'm just glad I decided to do this before grocery shopping!  The fridge was already a bit packed, and there was food spread out all over my kitchen counters!)  Once all the food items were out, I removed all the trays and drawers, washed them and wiped them down with cleaning wipes.  Ah, fresh, lemony clean!

OK.... I'll admit it.  I sort of had ulterior motives with this whole fridge clean-out thing! About a month ago, I spotted yet another neat product that I knew I had to try: Fridge Coasters.   What the heck is a fridge coaster, you may ask?  Well, simply put, it's a decorative, absorbent cardboard-thick liner that goes in your refrigerator!  There are super-cute patterns and colors (gray, blue, pink and yellow) and different sizes for different needs, but I knew I wanted gray and a mix of patterns.  (Hey all these patterns are so IN right now!) I was extremely fortunate to receive a "fridge pack" from Fridge Coasters.... BUT, my hubby knew I had been talking about these handy things, and he gave me a "fridge pack" as a birthday present!  YAY!  TWO whole fridge packs were just enough for me to cover every space!  All I did was line up the coaster with my shelves and drawers and figure out how to size them.  I removed some perforated pieces, and I cut down some others.  It's super easy.  No real thinking involved! :)

These photos show how incredibly cute -and neat - my super-clean refrigerator door turned out, with my gray fridge coasters dressing up a once all-white, dull bunch of bins, and how dapper and tidy the drawers and shelves look!  I love it... almost enough to NOT return the food....  Hmmmmmm.


Since a refrigerator with no food makes no sense, I went ahead and reloaded my food items (sans a few expired or unneeded things), and now we can enjoy a clean, organized fridge that stores food... in style!


Now, THAT's neat!


NOTE: Fridge Coasters supplied me with one pack of "fridge coasters," but they did not pay me to say any of the above.  Those are all my thoughts!

Wednesday, June 6, 2012

Day 125: Washing the Dish Washer


We’ve broached the topic of washing the washing machine, which I never in all my life thought would be necessary.  So, of course, another device that doesn’t seem to need cleaning would be – the dishwasher.  I mean, it’s running all the time, cleaning dishes, so you’d think it would remain sparkling, sanitized and perfect.  Right!?!?  I suppose if we ran on that theory, then the shower and the tub would never need cleaning, either.  Yuck.  So, if your dishwasher looks or smells a little funky, just give these three simple steps a try!  You can get a cleaner, gunk-free dishwasher, and you may improve the overall life of this much-needed kitchen appliance, too!

FIRST: Remove the bottom rack and examine the drain area; make sure there are no nasty food bits or random chunks of stuff that could block the drain, cause damage to the pump or even scratch your dishes!  When I unscrewed the dishwasher spray arm (white thing in my hand) from the bottom of our dishwasher, I found a small, sharp (very clean) pairing knife lodged by the pump/motor (gray thing).  That's probably not a good thing... ;)

SECOND: Place a dishwasher-safe cup filled with plain white vinegar on the top rack of the dishwasher. Using the hottest water available, run the dishwasher through a cycle. (Except for the cup of vinegar, the dishwasher will be empty.) The vinegar will help sanitize your dishwasher and will help remove any musty odors.
 
THIRD: When the cycle is complete, sprinkle a cupful of baking soda around the bottom of your dishwasher, and run it through a short but complete cycle using the hottest water. The baking soda will help freshen the smell of your dishwasher and will brighten up the look of the inside of the appliance by removing stains.

Now you can use your dishwasher again, as normal... but hopefully it's much cleaner... and safer!


Now, THAT's neat!

Tuesday, May 1, 2012

Day 122: ToweLocs, a Neat Product


I discovered something rather interesting today while looking around Organized A to Z, a fun - and tempting - organizing products website... and now I am considering adding a whole new level of organization to my home.  Ok.... not exactly.  But it is a cool concept.

Just think about how many times you have had to rearrange a towel in the bathroom or the kitchen or how many times you have found said towel on the floor, in a little, crumpled-up, mildew-loving heap?!?  Well... these little gadgets, called ToweLocs, are decorative items that keep your towels in place until you are ready to replace them!  WOW! Love this idea!

To use these clever devices (available in different decor; I'm showing the "tile" since I like it!), just poke the pin side of the ToweLoc through the towel, one layer at a time, and then secure the backing.  Then... arrange your towels... and enjoy them!  Your towels will stay put!


Now, THAT's neat!

NOTE: Here is the website for ToweLocs!  http://www.towelocs.com/ Even MORE great designs and ideas there!


UPDATE: And here are MY ToweLocs in use in MY home! :)


Saturday, January 28, 2012

Day 113: The Fridge File

It seems that I am always picking up random scraps and pieces of paper, even though I do my best to sort mail, bills and other important what-nots, not to mention all of the lovely little paperclips, toys, markers and other random items that wind up on the kitchen counters or in the centerpiece on the island. (Don't you LOVE these space-alien shrinky dinks? It's a new decor MUST!)

I guess I still have yet to find the perfect catch-all spot.... until today! So, if you feel a little crafty (just a teensy bit, I promise!), then get out some scissors, packing tape and pretty paper. This is an AMAZING idea from a fellow blogger (spotted on Pinterest). It really is amazing how you can turn something so plain, simple and everyday into something beautiful, fun and useful!

THE do-it-yourself, recycled-cereal-box FRIDGE FILE:
1. Select an empty cereal box of your choice. (Iain helped us "empty" this one by eating the rest of the cereal!)


2. Cut off the top, and shape the box so that the front is a little smaller than the back.

3. Secure all edges with sturdy packing tape. (You don't want all those odds n' ends escaping their holder and crashing to the floor!)


4. Wrap the box neatly like a package, using your choice of wrapping paper or scrapbook paper. I like scrapbook paper, since it's sturdier! (You can use a coordinating pattern or color on the inside, or do it all the same! I also decided to add some ribbon and a little "happiness always" stamp with a metal plaque on the front; I also distressed the paper to give it that cool, antique look!)


5. Hang your new "fridge file" with some coordinating, magnetic clips!
(I am showing the blogger's version, too, for some added inspiration! And... BTW, yes, I plan to go out and get some "coordinating" clip magnets ASAP... instead of using SpongeBob!)

6. ENJOY your handy, new storage - for mail, school papers, coupons, random tidbits or whatever your heart's desire!


Now, THAT's neat!

Wednesday, June 15, 2011

Day 106: Neat chalk?

When I was teaching high school, I refused to use a chalk board. I hate chalk. It makes my nose itchy. And I REALLY hate erasers. Yuck. They are always... so... chalky!

Of course, I DO love my flat, vinyl chalk board in my kitchen (click HERE to see that post). And while I was talking about my dream pantry from last post with my sister-in-law (who also loves the neat, organized, containerized and labeled look), I remembered that I had a "wet erasable" chalk "marker" from Uppercase Living with the rest of my stash of goodies and samples.

OK. I LOVE this thing! It is NOT chalky or messy... and it writes so beautifully! It's liquidy and smooth and lovely! You can see the difference between the "real" chalk that's already here... and the new chalk marker writing!


You will love them, too, if you have a chalk board... or if you plan to add one to your kitchen wall to keep track of schedules; plaster one on the fridge to take notes of what you need to buy next trip to the grocery store; or crop one down to make neat labels for your pantry... or for anything else in your home!

Want some chalk "markers" of your own? Click HERE! (There are 3 different colors.) Want a vinyl chalk board, too? Click HERE! (There are several sizes and fun shapes!)


Now, THAT's neat!

Sunday, June 12, 2011

Day 105: The Beauty of Labels

This is not my pantry.... And I am a little jealous! :)


This is the very organized pantry of Lori M., a new acquaintance of mine. And while I do use the Tupperware containers and organize everything as neatly as possible (similar items together and labels out!), I do not have the luxury of putting everything in a container. (I have a LOT more items in my pantry!) And I do not have a label on everything, either. But isn't this a wonderful idea!?!?

This is kind of like my dream pantry.

WHY?
1. I love how just about everything matches. It really is a pretty pantry!!!! But if you don't have every Tupperware container ever made (ha-ha!), then use what you DO have! All sizes and shapes are welcome!

2. I love using containers for just about all the food in the pantry. It's great to have items like flour and baking mix in air-tight containers. It looks good, stacks well... AND it will stay fresh much longer. (It's also more difficult to spill!)

3. I love the labels. I really think I would label everything, if I could! It looks SO neat, and it's so very functional! You can print out labels or just write on the traditional, sticky, office kinds that you can pick up almost anywhere. (Color coding might even come in handy here....) OR, you can do what Lori did in her pantry: cut up a piece of Uppercase Living's chalkboard vinyl into various sizes. (This method won't leave you with sticky residue if you decide to remove the labels.) Then, apply the custom sizes to your containers, and write right on them! Of course, my handwriting isn't as great as my friend's. BUT, this should spark all of our imaginations!

Lori has also given us an EXTRA NEAT tip: write directions, recipes or notes on the containers! This is great for reminding yourself how to make pancakes or biscuits or how long to boil your noodles!


Now, THAT's neat!

Thursday, June 9, 2011

Day 104: Pretty Neat Soap

I have no problem with keeping some "not-so-beautiful" things out in plain view, if they are things that I use daily. I mean, it is a bit impractical to store ALL our everyday items out of sight.

Of course, a bottle of dish-washing liquid isn't all that attractive....


But who says you CAN'T have a nicer way to use and display these plain, dull things?!?

As y'all know, I love using baskets and decorative boxes to stow away items that are useful but may not be too attractive. Neither works very well with liquid items, though! ;) SO, here's a GREAT way to beautify a simple, useful cleaning product.


I bought this lovely glass bottle at Hobby Lobby and just squeezed the dish liquid right in! Now, it's sitting in the exact same spot... but it looks a whole lot better!


Now, THAT's neat!

Monday, April 25, 2011

Day 97: Happy Oven Cleaning

It was my fault. I should NOT have used a cake pan that I'd never used before... on Easter morning... while making the Easter dessert!

If I had gone a more familiar route (AKA the tried-and-true Bundt pan), I likely would not have ended up with chocolate-chip pound cake rising up over the never-used pan and oozing like lava all over the oven.

*sigh....
(Cue oven cleaning.)

I decided to attack the problem (after the oven cooled, of course) with some baking soda, damp paper towels and a little elbow grease!


I just dusted baking soda over the slimy spots and let it sit for a moment....


Then I scrubbed gently with some damp paper towels. Most of the grime kind of solidified and got picked up by the baking soda. It was pretty gross.


My quick-fix, baking-soda method worked ok, for the most part; but some of the stubborn, baked-on goo needed "the big guns."

(Enter husband with razor blade.)

Yep. My sweet, helpful hubby got in on the Easter-morning-oven-cleaning action and carefully scraped off the remaining gunk... with a razor blade! EEK! (This is a cleaning method I tend to shy away from... mostly because I am accident prone and bad with sharp objects!) But it worked! And my oven was nearly returned to its original glory! :)


I, of course, lined the bottom of the oven, again, with some heavy-duty aluminum foil. As I've mentioned before, it's much easier to toss out a dirty sheet of foil than it is to clean the oven, and the foil catches the majority of the random food escapees and splatters (except when you have an occasional, unexpected lava flow!)


I also got a wild hair and decided to turn on the "self clean" for the very first time. I don't know why, but this high-heat, door-locking, oven-cleaning cycle always freaks me out a bit. And it was still going when we left for Easter dinner... with my lop-sided pound cake! And since we returned home late last night, I still need to peek inside (and get another photo) to see if my oven is even cleaner now!

Stay posted for an update! ;)


Now, THAT's neat!

Thursday, March 3, 2011

Day 89: Quick Tip for Wayward Pouches

I have a bunch of food pouches in my pantry... you know, those mixes for tacos and chili and seasoned fries. Well, those said pouches tend to fall through the cracks, literally. And I was pretty tired of mounting an all-out search for these seasonings and such while in the middle of cooking.

So... simple solution: I took one of those "throw-away" plastic containers and stuffed all the pouches inside. Now, I can find what I need without straining my back while leaning over, balanced on one foot, digging around the bottom of the pantry where extra paper towels and other odds n' ends reside! :)

Add THAT to your neat freak bag o' tricks!


Now, THAT's neat!

Tuesday, January 18, 2011

Day 80: My CUPS Runneth Over

Plastic cups.

They migrate... frequently.
They multiply... often.
And they will randomly launch themselves at unsuspecting beverage seekers from their precarious positions in the kitchen cabinets!

If your plastic cups are taking up way too much real estate all over your kitchen (perhaps even invading the pantry!?!?), you might want to herd them up and give them a new home. Together. Where they will cause much less damage and frustration!

Although these cups aren't pretty (I mean, face it, we've collected these cheapies and freebies from decades of yard sales, birthday parties, concerts and ball games), they do deserve some attention. So summon your organizing prowess, and clear a cabinet just for the cups. Swallow your pride, and just stack 'em up by size.


Now, I've let some coffee mugs take up residence here, along with a few water bottles, but this cabinet is probably 83% plastic cups. Every once in a while, they'll start to form a rebellion and try to wobble and lean their way off the edge of the shelf in order to hit someone in the head or bounce all over the floor. But, most days, the cups stay pretty neat and organized. I haven't found a stray in the dog food for a while. And the cup count has remained pretty steady.


Now, THAT's neat!

Monday, January 17, 2011

Day 79: The Pyrex Complex

Ok... back to those kitchen cabinets that we started talking about the other day...

As a neat freak, y'all know that I love to keep "like" things or families of items together. It just makes sense to me. And it makes it SO much easier to store, locate and use said items.

Well, the same can work in the kitchen, and that's why I keep all my glass cooking stuffs (AKA Pyrex) in the same cabinet!

It doesn't look all that impressive. And, frankly, it can get rather heavy to wriggle out what I need. But, until I can figure out how to add more shelves or create some other clever storage rack, this is how it is! ;)


You can see that bowls (on the bottom) are stacked in bigger bowls. And squares/rectangles are stacked in bigger squares/rectangles (on the middle shelf). I left the top shelf for a few of the "serving pieces" (AKA glass bakeware with pretty patterns on them!) since I don't fish them out quite as often as the other pieces. As well, my beloved Pampered Chef batter bowl has a spot of its own up there... which is easy for me, since I'm 6-feet tall! (If you are not quite as, uh.... blessed with high altitude, you might want to try stacking/storing your most-used items at a lower, more convenient, level!)

Neat Freak Cheat Sheet: I lined each shelf with some rubbery, non-skid stuff so the glass has a cushier landing!


Now, THAT's neat!

Tuesday, January 4, 2011

Day 77: Everyday Dishes

People always tell me that one of the worst disaster areas in their homes is their kitchen. Well, this is not hard for me to believe. After all, a lot of events take place in the kitchen... besides just cooking and eating! Kids do homework here. Crafts get spread all over the tables in this space. Random items get dumped on counters as folks walk in and out of the house. The kitchen is the epicenter of the home, so it makes perfect sense to me that this room is in need of some extra loving care when it comes to getting organized! So... I am going to do a few posts about my kitchen cabinets... where a lot of needed and necessary kitchen items may get "lost" or "hidden!"

So, let's talk about everyday dishes. These are the plates and bowls that your family uses everyday. We're not talking about the "nice" China. We're talking about the inexpensive set (or mismatched hand-me-down sets) that come in odd numbers and might or might not have a few cracks or chips. (I probably don't need to say this, but cracks and chips are dangerous. A few more trips in the dishwasher, and you might have a bloody finger... or lip! Consider saying "good riddance" to these items!)

Personally, I recommend keeping everyday items (yes, even the plastic character bowls and plates that my children use on a daily basis) together in one cabinet, if at all possible. Some might argue that all plates go together and all bowls should have their own space, but I find it much more practical to keep my sets together. It's better for setting the table and for emptying the dishwasher, since they all come from -- and go back to -- the same cabinet! Of course, I still keep all my plates and bowls stacked in nice, neat piles.


As you may see, I also like to use a little bit of decorating tips (like propping a taller serving platter or bowl behind the other items for a little interest) so my cabinets aren't an eyesore, should a random stranger or family member open it up for a peek! BUT... there's no magic to this. Just keep in mind: "a place for everything, and everything in its place!" This way, everything has a permanent home, and everyone knows it! You won't hear my hubby asking, "Where are the cereal bowls?"


Now, THAT's neat!

Monday, December 27, 2010

Day 75: Messy Kitchen? Win big!

Have a messy kitchen? I say, "Who doesn't after the holidays?!?!"

After baking special treats, shopping, going on vacation, serving planned and pop-in guests and just getting behind on the ole' cleaning routines, the heart of the home can certainly become a bit of a disaster at Christmastime! BUT... this is GOOD news for you! My friends over at SonicScrubbers are holding a "messy kitchen" contest! (Perfect timing, right?!?!?!) The messiest kitchen will win the grand prize of a FREE professional cleaning service! And other not-so-neat rooms will walk away with SonicSrubbers' awesome power cleaning tools, which I have personally used.... and personally recommend!

To enter, just send in your messiest messy kitchen photo. Click HERE for more details. (You can see photo entries on FaceBook. WOAH! What a mess!)

Good luck. Hope you can benefit from your mess! (The cleaning-up part can come later!)


Now, THAT's neat!

Monday, October 25, 2010

Day 64: A Cleaner Crock Pot


I already love my crock pot. I don't have an unhealthy obsession with it or anything, but I LOVE to use it and try out new -- and easy -- recipes! I mean, what's better for a busy, overworked neat freak than the opportunity to dump a bunch of ingredients into a slow cooker before an overly full day... and come home to a ready-to-eat meal!?!? *sigh....

That being said, I was talking with a friend the other day about crock pot recipes, and she reminded me of a perfectly neat product I have been meaning to try: crock pot liners!

That's right, there are LINERS you can put IN your crock pot so it's easier to clean up when you are done! I used Reynolds slow cooker liners, as pictured here.


And, boy, was it simple! Just place the liner in your crock pot (as directed) before adding ingredients. And after all is said and done (and your delicious meal has been devoured by a grateful family), pull the liner out and toss it away (or, keep everything intact and store it as is in your plastic container of choice!).

I loved not having to scrub and scrape off baked-on food bits! I simply rinsed out and wiped off my crock pot and put it right back into the cabinet! These liners are such a savings of time, energy and sanity! :)


Now, THAT's neat!

Monday, August 23, 2010

Day 53: The Beginnings of a SonicScrubber Super Fan (and a Get Neater GIVEAWAY!)

I was lucky enough to very recently receive a SonicScrubber to test out and review for my "Get Neater" blog... and I agreed -with elation- to try out this very handy little cleaning tool this weekend!


And now that a SonicScrubber is in my possession, I must ask: Where in the world was I that I did not know about this clever and amazing tool!?!?! (I suppose it could be that we haven't had cable TV in our home for 3 years, so I may have missed out on a commercial or two.) But, boy -- am I glad that I have access to one now!

Just to fill you in, the SonicScrubber is like a giant electric toothbrush... with WAY more power.... and way more options!


And I suppose you could clean your teeth with this rotating, power-cleaning wonder tool, but the manufacturers recommend using it for other items... like doors, walls, tile, grout, pots, pans, windows, counters, floors, appliances, furniture, fabric, carpet, toys, baseboards, ovens, grills, and YES... even (and especially) the kitchen sink! *whew!*

With just a twist of the wrist, you can switch the rotating tool or add special, disposable cleaning pads for just about whatever you can think of that needs cleaning! That means I am going to be a very busy (and very happy) cleaning whiz... for quite some time. (I can see this turning into a regular segment! Can't you?)


At any rate, to test out my new SonicScrubber tool, I decided to tackle the stove top. My hubby had recently used it, and that meant a dirty, crusty, splattered mess was left behind. See for yourself! (You can click on the photo to see it in more eeeewy detail!)
BEFORE:


Well, I squirted on some stove-top cleaner (the same Cerama Bryte cleaning product that I always use), twisted on the correct SonicScrubber accessory and non-scratch pad... and attacked that cooked-on, stove top gunk. Now, it took a few minutes to work through that cleaning paste, but with barely any effort at all, I had beautiful results. Check it out!
AFTER:


Typically, I spend about 15 minutes of hard, wrist-wrenching scrubbing to get a clean like that! But this suped-up toothbrush did all the work... with much better results! LOVE IT!

I am on a mission now to try the SonicScrubber on everything in my home! Ok, not everything! My 8-month-old son might be a messy eater, but I promise not to SonicScrub the greenbeans off his little chinny-chin-chin! So... just be sure to check back for more posts on this great cleaning tool as I work through my entire house!

*** GIVEAWAY ALERT!!!!!
Oh... and YOU can try the SonicScrubber in your home, too! I have an extra cleaning tool for this fun - and very first - Get Neater GIVEAWAY! To enter, just leave a comment on THIS post telling me how YOU would use the SonicScrubber to make YOUR home neater! (And get an extra entry if you follow this blog.) You can check out the SonicScrubber website by clicking HERE to get some more information and ideas! GOOD LUCK!
(The winner will be chosen by random drawing on August 31, 2010. Check back on September 1 to see if YOU won!!!)


* NOTE: Products were provided by the manufacturer, but all opinions are my own, and NO payment was received for this post! These are purely my own rantings and ravings, as always!


Now, THAT's neat!