Tuesday, October 2, 2012
Day 131: Oh yes... I did
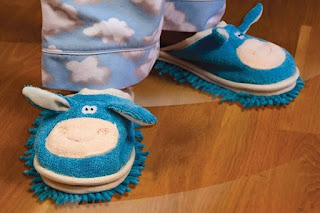
I am somewhat of a sucker when it comes to fun, new cleaning/organizing products.... and as I was tootling around the other day on an online shopping website, I stumbled across something neat: the "Slipper Genie."
These soft, colorful, fuzzy slippers are a neat freak's dream come true! Whenever my feet are cold, or whenever the floor has that not-been-mopped-lately look, I can slip these on (with a pair of socks if it's REALLY cold) and zip across the hardwood floors (or tile) in my home (and get a little exercise, too)! As you can see, the bottoms of these clever foot covers are fluffy cleaning "fingers" that can grab dog fur and swipe up dirt and dust bunnies... while I am busy cleaning or organizing other things. Talk about multi-tasking!
My daughter thinks these slippers are pretty fun, so I might have to buy her a pair, too. (YES - dual cleaning action... or is that quadruple, since there are four feet involved?!?!!) AND... since my little boy likes to copy just about everything his big sister does, I may end up with 3 of us, slip-sliding our way around the house.... all while banishing crumbs, hair and particles! YES - there are kid versions... adn they are super cute! (Oh, and the good thing is, the bottoms of these "mop flops" can velcro off, so you can toss them in the wash when you've been too busy cleaning floors!)
Now, THAT's neat!
Friday, September 14, 2012
Day 130: Bread ties - who knew??!
Plastic things. You know, the ones you find on bread bags? Some people call them "bread ties;" most people call them annoying! Every time you take one off to get a slice of bread, it disappears, and you end up just twisting the end of the bread bag and tucking it in on itself instead! I'm sure we have all misplaced many of these plastic bread ties or have just thrown them in the trash without a second thought. Until now....
Anyone else ever get mad at the tape roll (and at whoever used it last without folding a piece down)? Sometimes you turn that sticky roll over and over and over again for who knows how long, not able to locate that darn end. And when you finally do find the end, you can't get the tape to unstick from itself, or the tape rips off into little shreds, and you end up wasting about 2 feet in the struggle!
Well... think back to the aforementioned bread ties. Yep; those little plastic annoyances can become useful tools... in a whole new way! Ready for this little tip from the neat freak cheat sheet? Just stick one of these bread ties (or two, if the tape is wide) on the end of the tape roll, and you have an automatic saver... and an instant starter for next time!
BRILLIANT!
Now, THAT's neat!
Wednesday, July 25, 2012
Day 129: Jewelry Jumble... no more!
You may remember a while back when I posted about a truly unusual - and VERY neat - little black dress.... a little black dress that's actually an organizer for jewelry! Well... I couldn't resist this adorable doo-dad. I put it on my "wish list," and my wonderful hubby bought it for my birthday!
Following is the saga of getting all my jewelry - and the jumbled, annoying heap of boxes and bags it had become - into tip-top shape and ready for my new, little black dress!
First and foremost, here is the jewelry holder I was using. I was on the right track, with a convenient, hanging organizer on the back of my closet door... BUT this two-sided, pocket-loaded item did not have specific places for bracelets or necklaces. So, most of those bulkier items stayed in their boxes... and ended up in my sweater organizer!
I don't have a jewelry box, so the sweater organizer was the next best place. Everything was together... but everything was a mess. Any time I got any new jewelry, I just piled it on top of the other stuff! So, it looked like THIS!. :(
The next step was to take everything out of the sweater organizer and spread it out on the bed. Here is the mass of boxes and bags. Goodness! What a disaster! (And quite an embarrassment for a neat freak!) There was stuff in there that I hadn't seen in years... it was just too buried underneath all the other jewelry boxes!
I sorted through everything and tried to put items in places where they would be convenient and neat and where they would make sense to me... with "popular" earrings and necklaces near the top and less-often-used or larger items near the bottom.
I worked this method the same way on the flip side of the dress for all my necklaces and bracelets, and I tried to keep sets close together, as well! Everything looks super cute and super organized now! I just need to put it in my closet. (BTW: I did keep the other organizer with some other jewelry items in it; I just placed the organizer behind my clothes instead of on the door!)
I only had a few boxes and random items left over from the massive clean-up, and those went back into the sweater organizer. And one important item I kept here, mostly for convenience, is my watch. You can see it there on the bottom left. I wear it every day, and it was just easier to have it here! I can slip it on while I gaze at my lovely, little black dress of bobbles and bangles! ;)
Now, THAT's neat!
Wednesday, July 11, 2012
Day 128: Beautiful, neat fridge
Ok... so I have talked about cleaning BEHIND and UNDER the refrigerator before, but beyond throwing away anything green or growing, I have not addressed cleaning INSIDE it. Of course, as a neat freak, I am always cleaning up crumbs and spills with cleaning wipes. But, this time around, I decided to remove EVERYTHING... and get this darn ice box in order!
You can see in this photo that the spills and stains weren't terrible... but they were still there! Gross! And these goops and blobs, of course, can cause your fridge to smell a little funky. (I'm just glad I decided to do this before grocery shopping! The fridge was already a bit packed, and there was food spread out all over my kitchen counters!) Once all the food items were out, I removed all the trays and drawers, washed them and wiped them down with cleaning wipes. Ah, fresh, lemony clean!
OK.... I'll admit it. I sort of had ulterior motives with this whole fridge clean-out thing! About a month ago, I spotted yet another neat product that I knew I had to try: Fridge Coasters. What the heck is a fridge coaster, you may ask? Well, simply put, it's a decorative, absorbent cardboard-thick liner that goes in your refrigerator! There are super-cute patterns and colors (gray, blue, pink and yellow) and different sizes for different needs, but I knew I wanted gray and a mix of patterns. (Hey all these patterns are so IN right now!) I was extremely fortunate to receive a "fridge pack" from Fridge Coasters.... BUT, my hubby knew I had been talking about these handy things, and he gave me a "fridge pack" as a birthday present! YAY! TWO whole fridge packs were just enough for me to cover every space! All I did was line up the coaster with my shelves and drawers and figure out how to size them. I removed some perforated pieces, and I cut down some others. It's super easy. No real thinking involved! :)
Since a refrigerator with no food makes no sense, I went ahead and reloaded my food items (sans a few expired or unneeded things), and now we can enjoy a clean, organized fridge that stores food... in style!
Now, THAT's neat!
NOTE: Fridge Coasters supplied me with one pack of "fridge coasters," but they did not pay me to say any of the above. Those are all my thoughts!
Monday, July 2, 2012
Day 127: Clever Travel Tool
Photo from breaboutique
Photo from hannahsbowtique
SO.... I spotted this clever, little washcloth/towel wrap on Etsy the other day, and I wished I had seen it just a little bit sooner, so I could have used this ingenious little tool on a recent trip!
These tidy, terry travel pouches are just SO darn neat! I usually just store hair products, tooth brushes and other like items in a 1-gallon ziplock bag; but they almost ALWAYS end up soggy, sticky and gross. Well, this soft pocket-thing is perfect for packing all those "messies, leakies and drippies" for any occasion away from home. Best of all: after using this wrap, just toss it in the wash when you return home, and it will clean up nicely and be fresh and ready for your next trip.
If you're handy with a sewing machine, just get a large washcloth or a hand towel, fold one edge up a bit, and sew in some different sized pockets. If you're not into sewing, don't have a sewing machine or just don't have the time or energy to figure it out, then look up "travel towels" on Etsy (or click the photos, above, for these fun styles)!
Now, THAT's neat!
Friday, June 15, 2012
Day 126: Clever Scent Spot
Do you want your bathroom to smell lovely, without burning out all of your candles or using up air fresheners? (Don't get me wrong, I LOVE using lovely-scented everythings in our WCs, but sometimes I am not there to refresh, plug in, spray or light!) Well, here is a clever, little tip, straight from the "Neat Freak Cheat Sheet." Just put those scented oils to use!
Every time you load up a new roll of toilet paper (and you know it will be you, since apparently no one else in the house knows how to reload those oh-so-complicated TP tubes!), add a drop or two of your favorite scents. Every time someone spins the roll, the scent will be released! Simple, right! ;)
Now, THAT's neat!
Wednesday, June 6, 2012
Day 125: Washing the Dish Washer
We’ve broached the topic of washing the washing machine, which I never in all my life thought would be necessary. So, of course, another device that doesn’t
seem to need cleaning would be – the dishwasher. I mean, it’s running all the time, cleaning dishes,
so you’d think it would remain sparkling, sanitized and perfect. Right!?!? I suppose if we ran on that theory, then the shower and the tub would never need cleaning, either. Yuck.
So, if your dishwasher looks or smells a little funky, just give these three simple
steps a try! You can get a cleaner, gunk-free dishwasher, and you may improve the overall
life of this much-needed kitchen appliance, too!
FIRST: Remove the
bottom rack and examine the drain area; make sure there are no nasty food bits
or random chunks of stuff that could block the drain, cause damage to the pump
or even scratch your dishes! When I unscrewed the dishwasher spray arm (white thing in my hand) from the bottom of our dishwasher, I found a small, sharp (very clean) pairing knife lodged by the pump/motor (gray thing). That's probably not a good thing... ;)
SECOND: Place
a dishwasher-safe cup filled with plain
white vinegar on the top rack of the dishwasher. Using the hottest water
available, run the dishwasher through a cycle. (Except for the cup of vinegar,
the dishwasher will be empty.) The
vinegar will help sanitize your dishwasher and will help remove any musty odors.
THIRD:
When the cycle is complete, sprinkle a cupful of baking soda around the bottom of your dishwasher, and run it through
a short but complete cycle using the hottest water. The baking soda will help
freshen the smell of your dishwasher and will brighten up the look of the
inside of the appliance by removing stains.
Now you can use your dishwasher again, as normal... but hopefully it's much cleaner... and safer!
Now, THAT's neat!
Monday, May 28, 2012
Day 124: Overpower the power cords
Country Living magazine posted a super-neat idea for wrangling up all those tangly, high-tech charging cords from cell phones, MP3 players, PDAs, cameras, etc.... while repurposing a low-tech shoe box! And I just had to share this with all of you! (And now I am on a hunt for extra-large eyelits... and you will soon see why!)
Just so you know, I am kind of torn when it comes to shoe boxes. On one hand, they are nice places for shoes to go when they are not on someone's feet, but shoe boxes can take up a lot of room, and, let's face it, how often are the people in your home putting shoes back in their shoe boxes after or between uses!?!? That's why shoe boxes most often end up in the recycling bin at our house, unless my daughter has some creative craft project in mind or we need to make a diorama! :)
At any rate, we all know how much more "plugged in" we all are nowadays. And if you don't have a handy gadget like this for multiple USB ports and regular plugs, then those cords can easily become a bit of a nightmare!
Where do you plug them in? How do you store them? How do you keep them from taking over a kitchen counter, nightstand or desk? Well, that little, white Belkin hub in the outlet in our kitchen certainly helps with the first question. But here are steps to create an awesome (and lovely) cord storage/organizer and tackle those other important questions!
STEP 1: Find and empty out a clean, sturdy shoebox. Measure and cut wallpaper, heavy-duty wrapping paper, scrapbook paper or decorative fabric to the dimensions, wrapping the top and bottom pieces separately. Secure the material or paper with spray adhesive. (You can also use Mod Podge or other glues, but spray adhesive is AWESOME for projects like this!)
STEP 2: On one side of the box, measure and mark placements for four, evenly spaced eyelet holes. Make the first hole about 3 inches in from the box's edge. Cut eyelet holes with an X-Acto knife. Repeat on the other side, aligning the holes so the cords can cross through the box.
STEP 3: Purchase an extra-large eyelet kit from a hardware store, and fit the pieces using the manufacturer's directions as a guide.
STEP 4: Plug in your cords, feed the wires through both sets of holes and close the lid; recharge your gadgets.
{{{{SAFETY TIP: Keep electrical devices such as plugs and power strips outside the shoebox, to avoid risk of heating up or fire}}}}
Now, go to it! You have the power to overpower the power cords in your household! ;)
Now, THAT's neat!
Monday, May 7, 2012
Day 123: I'm Dreaming of a Custom Closet...
I think that most of us neat freaks (or nor-so-neat freaks) can admit that we secretly (or not-so-secretly) dream of a place for everything... and everything in its place... and even a color-coded label for everything, too! And one thing that I've always dreamed of is an organized and beautiful bedroom closet. Ok, actually I've dreamed of all my closet spaces, storage areas and the garage being organized and beautiful. But until I strike it rich - in the area of money AND time - I guess I can just keep collecting ideas for what my perfect storage spaces would entail!
Of course, I've already got some things working in my favor in my bedroom closet. As y'all know, I love boxes and baskets for gathering, categorizing, sorting AND decorating items. These work perfectly - even in the smallest spaces - for managing everything from shoes and socks to scarves and jewelry. I also store all my clothes items with "like" items. For instance, t-shirts all go together, followed by sleveless shirts and other dress shirts on one bar. Below, all my jeans, dress pants and capris hang next to long-sleeve dress shirts and sweaters. (And, no, I don't color code!)
But even with a plan in place, I do find myself limited by my closet's overall design... or lack thereof! That's why I drool at photos like THIS, showing a perfectly ordered and lovely space from closet organizers like California Closets!
(Photo courtesy of California Closets.)
Or THIS.... which, of course, might be about the size of my entire bedroom! Ha-ha!
(Photo courtesy of California Closets.)
But even smaller spaces (like those "reach-in" closets) can be functional and beautiful. For example, I would absolutely LOVE to have a guest bedroom closet like THIS that was worthy of being displayed - sans doors! Amazing!
(Photo courtesy of California Closets.)
If you want to get started on the closet of your choice and make it the closet of your dreams, incorporate those little organizational pieces, like shoe storage and hanging "shelves," and make your closet make sense for you. If color coding is your thing, then by all means - arrange by hue! Just be sure to purge unused or unwanted items along the way (donation boxes are ready and waiting!). OR... you can go for the gusto, and get a custom-designed closet! Yep. A professional closet designer from California Closets can help you see your storage nightmares as hidden potential! Then perhaps YOUR closet photo will be the next to go in my growing file of storage solution designs and ideas!
Now, THAT's neat!
NOTE: This is a sponsored post. But all thoughts and opinions are the author's!
Of course, I've already got some things working in my favor in my bedroom closet. As y'all know, I love boxes and baskets for gathering, categorizing, sorting AND decorating items. These work perfectly - even in the smallest spaces - for managing everything from shoes and socks to scarves and jewelry. I also store all my clothes items with "like" items. For instance, t-shirts all go together, followed by sleveless shirts and other dress shirts on one bar. Below, all my jeans, dress pants and capris hang next to long-sleeve dress shirts and sweaters. (And, no, I don't color code!)
But even with a plan in place, I do find myself limited by my closet's overall design... or lack thereof! That's why I drool at photos like THIS, showing a perfectly ordered and lovely space from closet organizers like California Closets!
Or THIS.... which, of course, might be about the size of my entire bedroom! Ha-ha!
(Photo courtesy of California Closets.)
But even smaller spaces (like those "reach-in" closets) can be functional and beautiful. For example, I would absolutely LOVE to have a guest bedroom closet like THIS that was worthy of being displayed - sans doors! Amazing!
(Photo courtesy of California Closets.)
If you want to get started on the closet of your choice and make it the closet of your dreams, incorporate those little organizational pieces, like shoe storage and hanging "shelves," and make your closet make sense for you. If color coding is your thing, then by all means - arrange by hue! Just be sure to purge unused or unwanted items along the way (donation boxes are ready and waiting!). OR... you can go for the gusto, and get a custom-designed closet! Yep. A professional closet designer from California Closets can help you see your storage nightmares as hidden potential! Then perhaps YOUR closet photo will be the next to go in my growing file of storage solution designs and ideas!
Now, THAT's neat!
NOTE: This is a sponsored post. But all thoughts and opinions are the author's!
Tuesday, May 1, 2012
Day 122: ToweLocs, a Neat Product
I discovered something rather interesting today while looking around Organized A to Z, a fun - and tempting - organizing products website... and now I am considering adding a whole new level of organization to my home. Ok.... not exactly. But it is a cool concept.
Just think about how many times you have had to rearrange a towel in the bathroom or the kitchen or how many times you have found said towel on the floor, in a little, crumpled-up, mildew-loving heap?!? Well... these little gadgets, called ToweLocs, are decorative items that keep your towels in place until you are ready to replace them! WOW! Love this idea!
To use these clever devices (available in different decor; I'm showing the "tile" since I like it!), just poke the pin side of the ToweLoc through the towel, one layer at a time, and then secure the backing. Then... arrange your towels... and enjoy them! Your towels will stay put!
Now, THAT's neat!
UPDATE: And here are MY ToweLocs in use in MY home! :)
Tuesday, April 24, 2012
Day 121: Knotty No More!
Necklaces make me mad. Well, not necklaces in and of themselves... it's the twisted, knotted ones that really irk me. Call it a pet peeve, if you will, but a tangled necklace is as good as broken in my hands. I just don't have the patience to deal with it! And if it's stuck on my neck because of a knot or a broken clasp, then I'll tug and pull until it snaps. It's terrible, really. If I ever needed anger management for anything, it's with necklaces.
That's why THIS idea makes me SO very happy!
What a clever and fun way to keep those darn, decorative strands separate and ready to wear! Just take a simple wood piece, painted or distressed to match your taste or decor, and add some knobs - random, colorful ones, matching knobs or just all the "extras" you have lying around in junk drawers! Hang it in a closet or bathroom or even on a door, and now necklaces have a happy - and safe - home!
Now, THAT's neat!
Sunday, April 1, 2012
Day 120: Chalk labels strike again
Y'all know that I LOVE using chalk panels, labels and charts for the kitchen and in the pantry. (You can see those posts HERE, HERE, HERE and HERE!) But there are just so many uses for Uppercase Living's awesome chalk (or dry erase) panels.
Here is a very neat idea for garage storage! Just get some galvanized buckets, slap on a chalk label, and write whatever it is that's supposed to go in that pail! You can store your labeled containers on a shelf or against a wall. You can also use colorful buckets, plastic bins or crates and have fun with stacking, sorting and color coding.
You can find lots of great chalk and dry erase options on my Uppercase Living website. But THIS is one of my favorite new sets. This awesome "tags and tidbits" set comes with all sizes and shapes, so you can have lots of fun using these in lots of fun spaces!
Now, THAT's neat!
Saturday, March 31, 2012
Day 119: Waxing poetic? (Or, how to get wax out of clothes)
Scented candles smell so nice,
but wax on clothes is ick.
To get it out, don't use ice;
a warm iron will do the trick!
So... my antsy, very tired toddler knocked over an entire Scentsy wax burner the other day. I was completely freaked out - FIRST, that he may have burned himself (...which he did not; the wax, thankfully, was not hot enough) and SECOND, that there was a pile of wax and bits ALL over the table, the hardwood floor... and my son's clothes. He looked like a melted candle. Of course, the blue wax was all over a brand new outfit. And, of course, company was coming over in just a few minutes. I was able to scrape the wax off the table and the floor with a little, plastic tool once the wax cooled. Then I cleaned off those surfaces, as usual. But what about those clothes?!?! I'd never had to deal with THAT mess before!
I looked online and found a few interesting solutions to wax removal (Note to self: be sure to clarify CANDLE wax in the search box!) but finally settled on a warm iron and paper bags. I tried to scrape some of the wax off first with a butter knife, but I didn't have too much luck. SO... I used some lunch bags that I tore open, and, believe it or not, after just setting the paper bag pieces directly on top of the wax and gently ironing it (yes - straight onto the bag) with a warm iron, the wax melted onto the paper... and the clothes were, relatively, clean!
You can see all the greasy looking splotches on the paper bags (it took about 4 bags total), but the wax came out, and I just washed his outfit as I normally would! SUPER easy! And I didn't set any paper bags on fire! ;)
Now, THAT's neat!
Monday, March 26, 2012
Day 118: Why didn't I think of that?
I'll tell you why I didn't think of that.... I don't like oatmeal.
Yep. It's a pretty well-known fact around my family that I do NOT like oatmeal. At all. Ever. No matter where it comes from or how it's prepared. (But that's another story for another day!) That's why I would have NEVER thought of re-purposing an oatmeal container to store ribbon! AWESOME idea!
Right now, my ribbon is kind of a haphazard mishmash of colorful insanity... tucked away in a pretty Stampin' Up bag on a nice, neat craft self! (Notice, I am not going to show you INSIDE the bag, as it would make most of us neat freaks cringe in horror!)
But a much better, neater and more efficient idea, of course, is to contain that ribbon madness, somehow. And all you need to do is grab an empty oatmeal container (in my case, I may have to just dump out the oatmeal to empty the container... just kidding! I DO use oatmeal to bake cookies!). Cut a fairly large hole in the side (large enough to see your ribbon spools!), and then Mod Podge on some pretty, patterned scrap paper to cover the container.
Then slip your ribbon spools inside so you can easily pull lengths out through the opening! Make as many as you need for optimum storage!
Now, THAT's neat!
Sunday, March 25, 2012
Day 117: Shake up some freshness
If you've read this blog, you've probably noticed that I like things to LOOK neat and to SMELL neat! ;) Well... I recently received a free sample of Downy Unstopables, and I knew I HAD to get some for my wash... from now until eternity!
These in-wash scent boosters make everything smell absolutely AMAZING! I keep finding myself stopping to smell my toddlers PJs or breathing in a hand towel before walking out of the bathroom. This stuff really works... and I LOVE it! You just shake these things into the washing machine, and run your cycle as usual! I have been using the "fresh" scent (the blue beads), but there is a "lush" scent (purple) as well! Try them, and let me know what you think... or, uh... smell! :)
Now, THAT's neat!
NOTE: No one from Downy or any other company paid me to say any of the things in this post. These thoughts are all my honest opinions!
Thursday, March 22, 2012
Day 116: If the Shoe Fits...
Ah, Real Simple magazine and your clever re-purposing ideas! I have a business trip coming up, and even if it's months away, I just can't stop my brain from listing items I need to bring and basically packing "in my mind." And one of the best and most clever "new uses for old things" is to snag a giveaway shower cap from a hotel. It becomes the perfect little plastic container for shoes when traveling, preventing them from dirtying clothes packed in your suitcase! Superb idea if you don't have a special shoe bag... or if you have some messy footwear! ;)
Now, THAT's neat!
Now, THAT's neat!
Monday, March 19, 2012
Day 115: Frame me for this!
We have a great local consignment/thrift store called Encore Resales... every time I go in there, I find so many unique items and crafty ideas. But my favorite things to bring home - something that's not too tough on the piggy bank - are these funky, white, distressed frames. I have used a bunch of them for decor, all over the house. But here are a few of my FAVORITE neat ideas for these frames:
1. MESSAGE BOARD: Put burlap, fabric or pretty paper in your frame, and then write on the glass part with a dry-erase marker. Keep up with menus, to-do lists, shopping needs, important phone numbers... whatever you need!
You can also skip the glass and create a magnetic board or a pin board. The white frame works well, either way!
2. KEY HOLDER: As we've discussed before, those pesky keys can run off when you need them the most. Use a plain, empty frame and screw in some cup hooks for an instant - and lovely - key holder.
3. "UGLY HIDER": It's amazing what a simple, white frame can do to hide those perfectly functional (and usually poorly positioned) household items!
Now, THAT's neat!
Subscribe to:
Posts (Atom)